
Photon Robots (AKA-Sprout)
Introducing Sprout, the highly configurable robot that can teach you to innovate and problem solve using principles of engineering. What will your Sprout do?
Watch this video of awesome younger students building a simpler version of SPROUT.
Introducing Sprout, the highly configurable robot that can teach you to innovate and problem solve using principles of engineering. What will your Sprout do?
Watch this video of awesome younger students building a simpler version of SPROUT.
You and your partner will follow this web-quest during the build process. You will find some aspects of this project very easy and some to be extremely challenging.
Remember what I always say...JUST TRY! If you give up, you are guaranteed to be unsuccessful. As long as you keep at it, you will make progress. It's not a race to the end, so take your time. If you get stuck, ask for help.
The goal for your Photon is to go through a specific obstacle course designed by your teachers. Good luck.
STEP 1- Get to know your Sprout parts.
In this intro section, you will familiarize yourself with the name of each part so we are not calling them "things." It's important to know what each part is. You may have to do some separate research though. You can fill out this information on your worksheet that you get from me, or download it below.
SOME WEBSITES TO USE:
Discover Create Advance Parts List
http://www.howstuffworks.com/electromagnet.htm
STEP 2- All about Sprout. Watch the videos by clicking the link here. These videos take each of Sprout's individual parts apart to show you how they work. Please watch the following videos from the list and write a summary of the video in your own words (about 4-6 sentences per summary):
Video Summary Sheet( Below)
Video Summary Sheet( Below)
All About Sprout Videos
STEP 3- Finally we can build!
Click here for the Build Videos. These are extremely important to follow STEP BY STEP (sorry, I just had to)! READ BELOW
****Here is how OUR SPROUT is slightly different than what is on the video:****
PLEASE ASK FOR HELP IF YOU ARE UNSURE! DON'T ASSUME YOU KNOW WHAT TO DO. YOU ONLY HAVE ONE CHANCE TO GET IT RIGHT.
STEP 4- What is a circuit anyways?
So by now, your Sprout is built and killing it in the obstacle course. Using up all the electricity in the battery. But, how in the heck does the electricity flow from the batter to the motors and the lights? How does the SPDT switch affect the flow of electricity? Check out this site to see the basics of electrical circuits.
STEP 5-Design Challenges! We have seen 3rd-9th graders building a version os Sprout. Now, how can you and your partner step it up? Welcome to the design challenge portion. This is where the real engineering and problem solving com into play. Below are some redesign challenge ideas. Feel free to come up with your own idea. The goal is that your Sprout is different from the original build process outcome.
Design challenge ideas:
Make your bot's eyes turn off when you turn the bot off with one switch
Make your bot go the fastest
Make your bot go in a straight line
Make your bot the best at completing a maze (most responsive)
Give your bot a personality
Make you bot blink
Advanced challenges
Can you control your bot with light?
Can you control it with an app you write?
Can you use an Arduino and write code to control you bot?
Process
Discuss the idea
Plan your solution
Test and refine, Test and refine, Test and refine
Compete
Present findings
PROJECT REFLECTION
Here is your Checklist for completing your Robot Project:
Please complete questions and checklist in this document, then copy and paste onto your DP!!!
-Create a page on your Digital Portfolio titled “Photon Robotics Project”
-Take a picture of your Robot, post on your DP
-Provide a short description of your Robot, including his or her name!
-Compete Reflection Questions, post on your DP
-Complete Robot Checklist (AT THE BOTTOM OF THIS DOC) and post on your DP
-Make sure all project assignments are turned in!
Reflection Questions( 3-4 Sentences Each!)
What was your favorite part about this project?
What was your biggest challenge during this project and how did you overcome it?
How would you describe your effort and use of your project block time?
What is one area that you need to improve for project work in the future?
How well did you and your partner work together? Did you both contribute equally?
How do you think your project partner(s) would describe your effort during this project?
What is your biggest takeaway from this project?
Check List:
-Does your robot move relatively straight?
-Do both lights work?
-Do your switches cause your motors to move in the opposite direction?
-Do you have an on and off switch?
-Did your robot make it through the obstacle course?
-Does your tool kit contain the following items:
-Needle Nose Pliers
-Helping Hand
-Soldering Iron
-Goggles
-Wire Strippers
-Soldering Stand (the one that came with it)
Click here for the Build Videos. These are extremely important to follow STEP BY STEP (sorry, I just had to)! READ BELOW
****Here is how OUR SPROUT is slightly different than what is on the video:****
- We have larger switches for the antenna (which should be easier to solder to).
- A new on/off switch which fits into the breadboard much better than on the video.
- Paper clips that are more sturdy that the ones on the video.
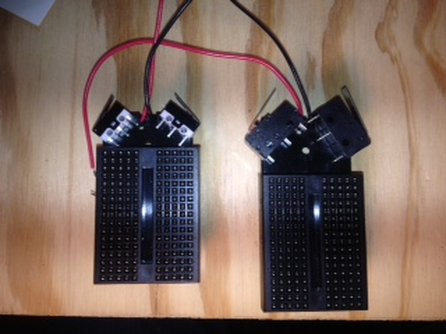
- Please note: Since the new antenna switches are larger (shown in the picture below) you should mount the edge of the breadboard further away from the front of the bot (about 3/4 of an inch from the front edge of the battery holder --see picture).
PLEASE ASK FOR HELP IF YOU ARE UNSURE! DON'T ASSUME YOU KNOW WHAT TO DO. YOU ONLY HAVE ONE CHANCE TO GET IT RIGHT.
STEP 4- What is a circuit anyways?
So by now, your Sprout is built and killing it in the obstacle course. Using up all the electricity in the battery. But, how in the heck does the electricity flow from the batter to the motors and the lights? How does the SPDT switch affect the flow of electricity? Check out this site to see the basics of electrical circuits.
STEP 5-Design Challenges! We have seen 3rd-9th graders building a version os Sprout. Now, how can you and your partner step it up? Welcome to the design challenge portion. This is where the real engineering and problem solving com into play. Below are some redesign challenge ideas. Feel free to come up with your own idea. The goal is that your Sprout is different from the original build process outcome.
Design challenge ideas:
Make your bot's eyes turn off when you turn the bot off with one switch
Make your bot go the fastest
Make your bot go in a straight line
Make your bot the best at completing a maze (most responsive)
Give your bot a personality
Make you bot blink
Advanced challenges
Can you control your bot with light?
Can you control it with an app you write?
Can you use an Arduino and write code to control you bot?
Process
Discuss the idea
Plan your solution
Test and refine, Test and refine, Test and refine
Compete
Present findings
PROJECT REFLECTION
Here is your Checklist for completing your Robot Project:
Please complete questions and checklist in this document, then copy and paste onto your DP!!!
-Create a page on your Digital Portfolio titled “Photon Robotics Project”
-Take a picture of your Robot, post on your DP
-Provide a short description of your Robot, including his or her name!
-Compete Reflection Questions, post on your DP
-Complete Robot Checklist (AT THE BOTTOM OF THIS DOC) and post on your DP
-Make sure all project assignments are turned in!
Reflection Questions( 3-4 Sentences Each!)
What was your favorite part about this project?
What was your biggest challenge during this project and how did you overcome it?
How would you describe your effort and use of your project block time?
What is one area that you need to improve for project work in the future?
How well did you and your partner work together? Did you both contribute equally?
How do you think your project partner(s) would describe your effort during this project?
What is your biggest takeaway from this project?
Check List:
-Does your robot move relatively straight?
-Do both lights work?
-Do your switches cause your motors to move in the opposite direction?
-Do you have an on and off switch?
-Did your robot make it through the obstacle course?
-Does your tool kit contain the following items:
-Needle Nose Pliers
-Helping Hand
-Soldering Iron
-Goggles
-Wire Strippers
-Soldering Stand (the one that came with it)
